How to Activate Genki eSIM

The Ultimate Guide to Activating Your Genki eSIM: Effortless Steps for Android and iOS Users

Welcome to the future of telecommunications! eSIMs, or electronic SIM cards, are revolutionizing how we connect with the world. Unlike traditional SIM cards, eSIMs are embedded directly into your device, offering a more streamlined and flexible approach to managing your mobile services. Today, we’ll guide you through the simple steps of activating your eSIM, whether you’re an Android or iOS user.

First, visit the GENKI MOBILE website to place your order, and receive the “Confirmation of eSIM Activation” email.

Things to Keep in Mind:

  • Ensure your smartphone is connected to Wi-Fi during this process.
  • Remember, the eSIM plan can only be downloaded once. A re-download, if necessary, incurs a fee of 1,500 yen.


eSIM Activation Guide for iOS Users:

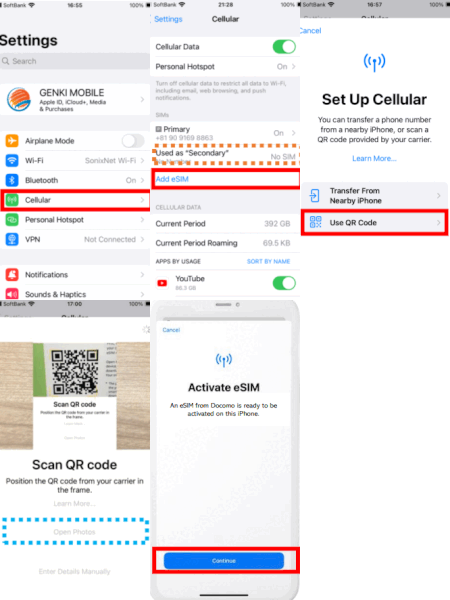
  • Head to “Settings” on your iPhone.
  • Select “Cellular.”
  • Choose “Add eSIM.”
  • If eSIM is listed already
    The latest iOS may download
    the eSIM automatically. If
    you already see our Docomo
    eSIM (starting with 020), your
    eSIM is already activated.
  • Opt for “Use QR Code” to scan.

eSIM Activation Guide for Android Users:


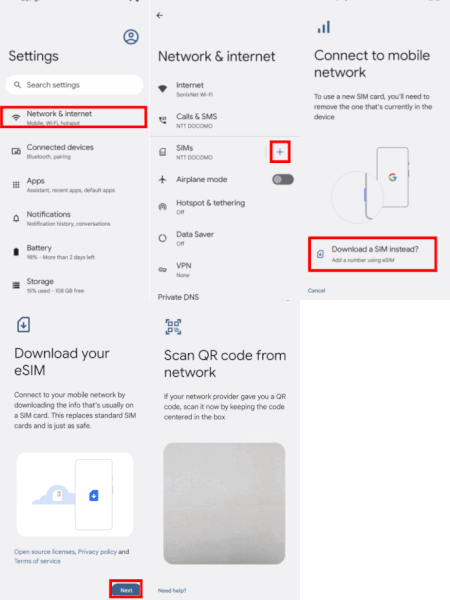
  • Open “Settings” on your device
  • Navigate to “Network & internet.”
  • Look for the “+” symbol next to SIMs and tap it.
  • Choose “Download a SIM Instead?”
  • Click “Next,” scan the QR code provided.


Final Step: Install the APN Profile
Don’t forget this crucial step! After downloading the SIM plan, install the APN profile to ensure your device functions correctly with the new eSIM. In order to install the APN profile for Android or iOS user.: 

iPhoneAndroid 
  1. Connect to Wi-Fi: Ensure your iPhone is connected to a Wi-Fi network.

  2. Download the APN Configuration File:

    • Access the Assist Solutions APN configuration file by visiting goo.gl/mJKBYT or by scanning the provided QR code.
    • It’s important to use the Safari browser for this step as the process may not be compatible with other web browsers.

 3. Initiate the Download:

    • After navigating to the link or scanning the QR code, select “Allow” when prompted. This action will begin the download of the APN configuration profile to your iPhone.
    • Once the profile is downloaded, you can close the page.


 4. Install the Profile:

    • Open ‘Settings’ on your iPhone.
    • Tap on “Profile Downloaded” to view the APN profile you just downloaded.
    • Select “Install” and, when prompted, enter your phone’s passcode to confirm the installation

 5. Restart Your iPhone: To ensure the new settings take effect, restart your phone.

  1. Open Settings: Begin by opening the ‘Settings’ app on your smartphone.

  2. Select Network & Internet: Navigate to the ‘Network & Internet’ section. This might vary slightly depending on your phone model and operating system.

  3. Open SIMs: Within ‘Network & Internet,’ find and open ‘SIMs.’

  4. Access Point Names: Here, look for ‘Access Point Names.’ On some devices, this might be under an ‘Advanced’ submenu.

  5. Adding a New APN: Tap the ‘+’ icon to add a new APN profile.

  6. Enter APN Details: Fill in the details as follows:

    • Name: SonixNet
    • APN: mvno.net
    • Username: genki
    • Password: genki
    • Authentication Type: Select either PAP or CHAP
    • Other fields: Keep as default

 7. Save the Profile: After entering the details, make sure to save the profile.

8. Selecting the Profile: Once saved, select ‘SonixNet’ from the list of APNs to apply these new settings.

9. Restart Your Device: Finally, restart your device to ensure the settings take effect.

If you are interested in renting a best portable Wi-Fi device (1GB/day or 7GB/day), a best SIM card (1GB/day) or a best eSIM (1GB/day) in Japan, make sure to check out our website at  https://www.genkimobile.com/

Related posts